
¶ Ace Data Cloud Browser Plugin Configuration and Content Publishing SOP (Standard Operating Procedure)
This SOP is designed to guide the team in completing two tasks:
- Installing the Ace Data Cloud browser plugin and completing account authorization;
- Completing channel binding, content preparation, publishing, and automatic publishing on the Ace Data Cloud platform.
¶ 1. Objectives and Overview
- Objective: To distribute articles/videos and other content to multiple self-media platforms (channels) through the Ace Data Cloud platform, enhancing distribution efficiency and achieving "low manual input" continuous promotion through automatic publishing.
- Prerequisites:
- Use Chrome browser
- Access to the Ace Data Cloud platform
- Downloaded and extracted the browser plugin zip file
- Browser plugin configuration document (within the platform): link
¶ 2. Core Concept Explanation
- Browser Plugin: Used to complete account authorization on third-party platforms (such as Zhihu, CSDN, etc.), allowing Ace Data Cloud to publish on your behalf.
- Channels: Authorization channels for accounts on target publishing platforms (such as Zhihu, CSDN, Juejin, etc.).
- Materials: A pre-made content library provided by the platform that can be used/referenced directly.
- Docs: Drafts of the content you are preparing to publish (can be generated from materials or created by yourself).
- Publishing Tasks: Records generated from each publishing operation, used to track status, links, and results.
¶ 3. Plugin Installation SOP
¶ 3.1 Download the Plugin
- Visit the download link and download the zip file:
- https://cdn.acedata.cloud/i9h4af.zip
- After extraction, you will get a plugin folder (keep the folder structure unchanged).
¶ 3.2 Install the Plugin (Chrome)
- Enter in the Chrome address bar:
chrome://extensions - Enable Developer mode in the upper right corner
- Click Load unpacked
- Select the plugin folder you just extracted and confirm
¶ 3.3 Verify Successful Installation
- Open the Ace Data Cloud distribution center page and refresh:
- https://platform.acedata.cloud/console/publish
- If the page no longer shows the "Browser plugin not installed" prompt, the installation is successful.
¶ 4. Content Publishing Platform SOP (with screenshots)
The following SOP is based on the platform page: Distribution Center → Channels → Docs/Materials → Publishing Tasks → Automatic Publishing
Screenshot explanations:
- Screenshot 1: Publishing Center
- Screenshot 2: Channel Management
- Screenshot 3: Publishing Tasks
- Screenshot 4: Publishing Overview/Summary
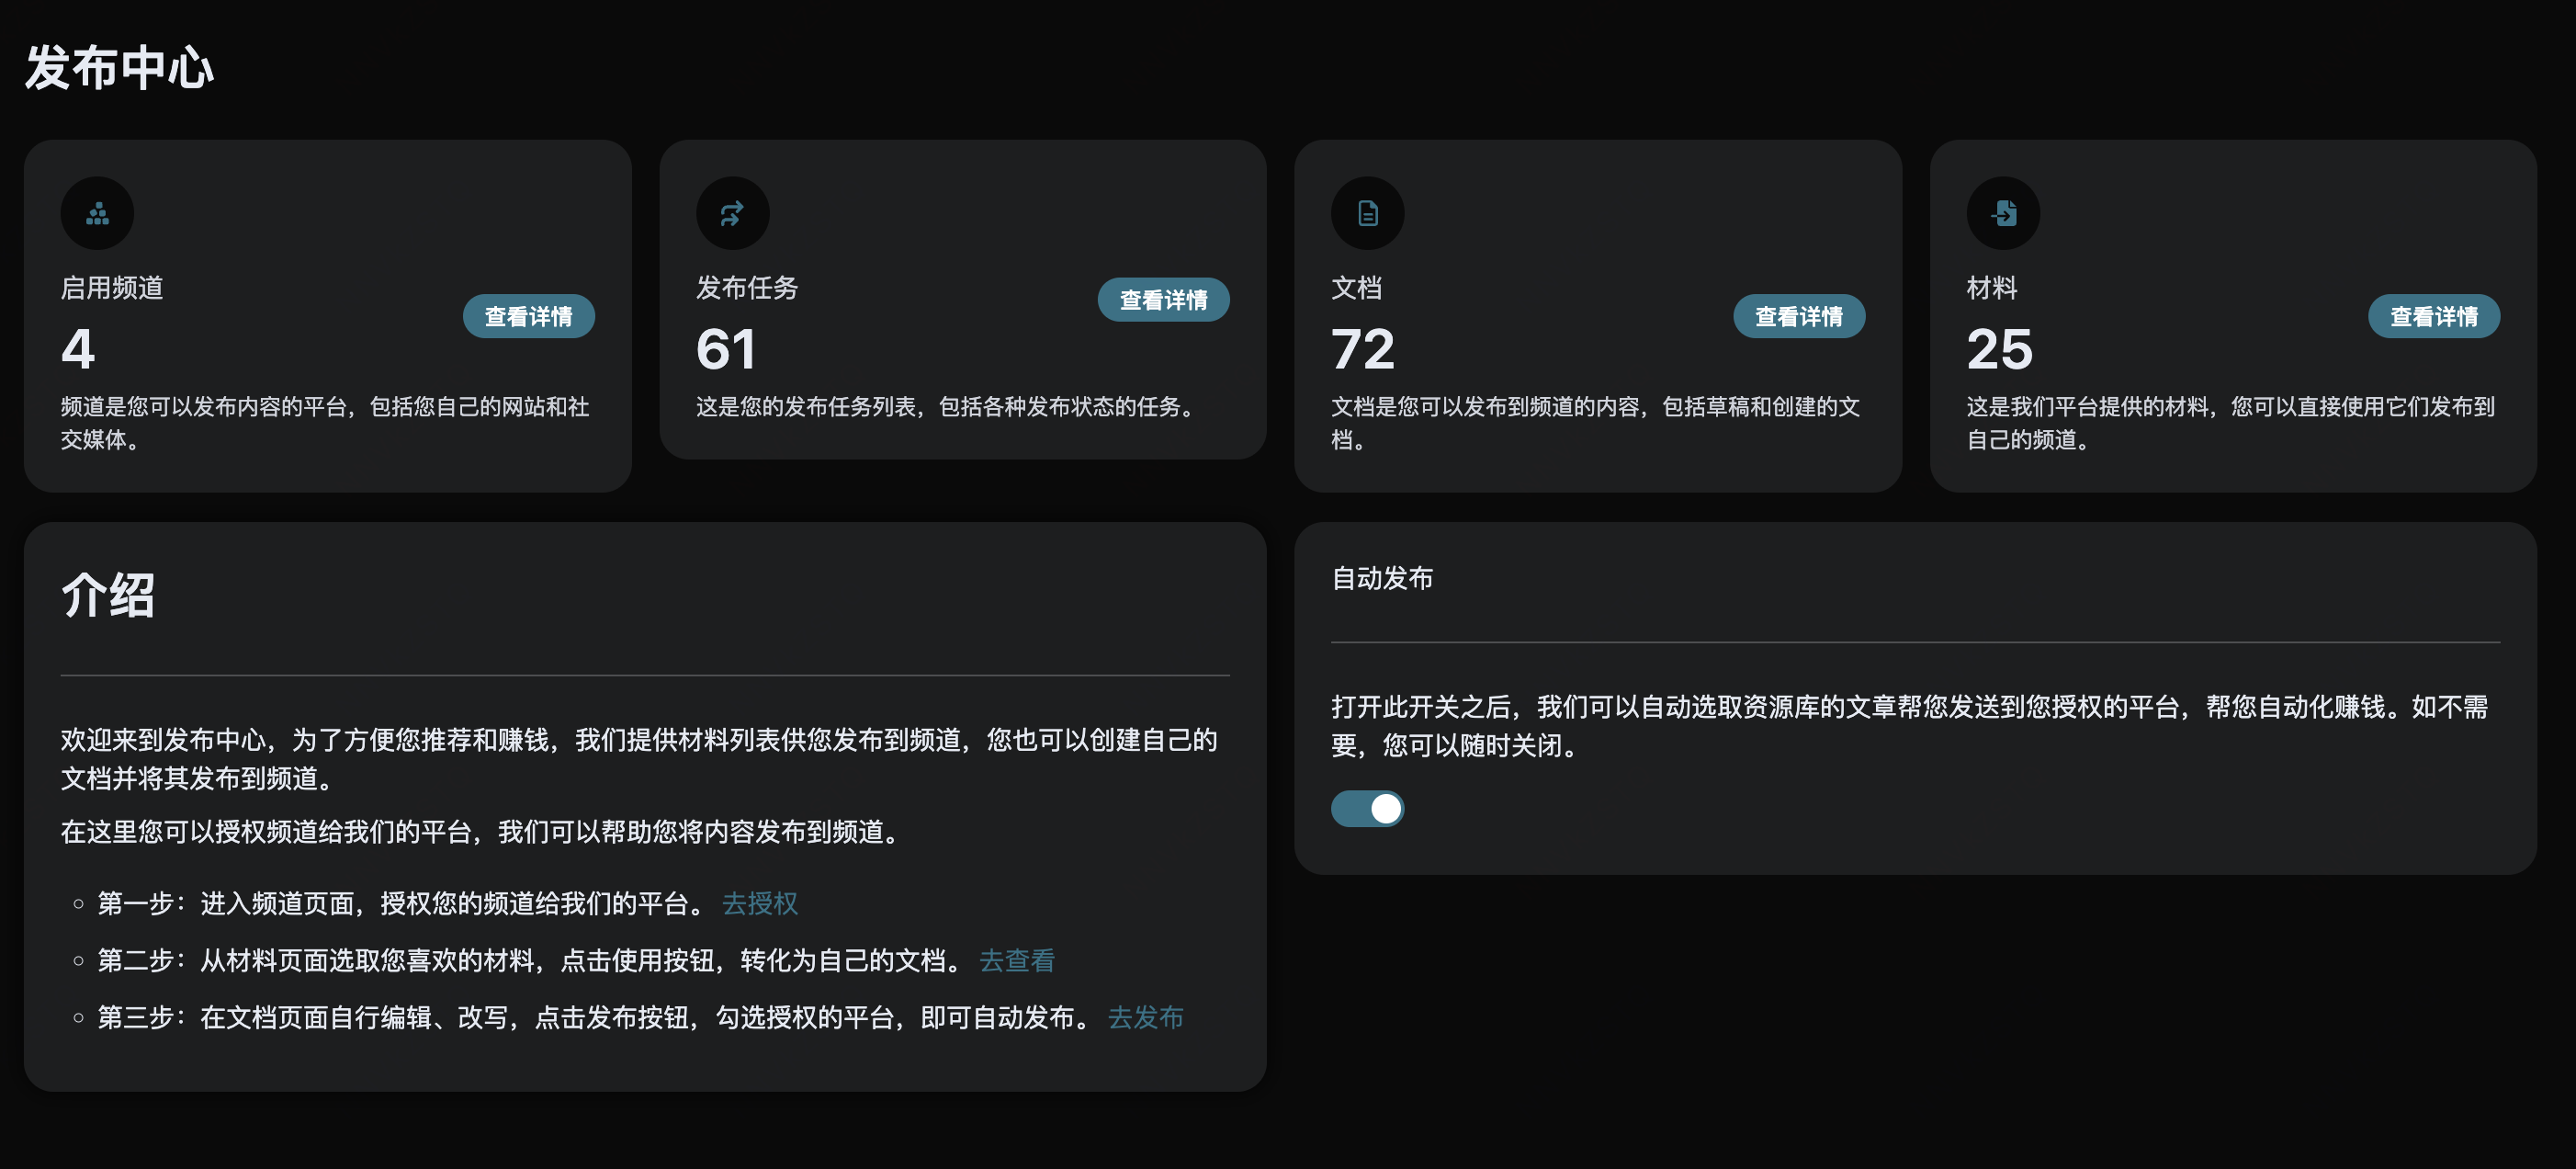
¶ 4.1 Step One: Enter the Publishing Center (Overview and Automatic Publishing Switch)
- Objective: Confirm the plugin status is normal and understand the "Automatic Publishing" entry and overall status.
Operation:
- Enter the distribution center: https://platform.acedata.cloud/console/publish
- Check for any abnormal prompts such as "Plugin not installed"
- Familiarize yourself with the automatic publishing module and overall overview information on the page
Checkpoints:
- The page displays normally, with no plugin missing prompts
- The automatic publishing module (switch/instructions) is visible
Screenshot 1 (Publishing Center)
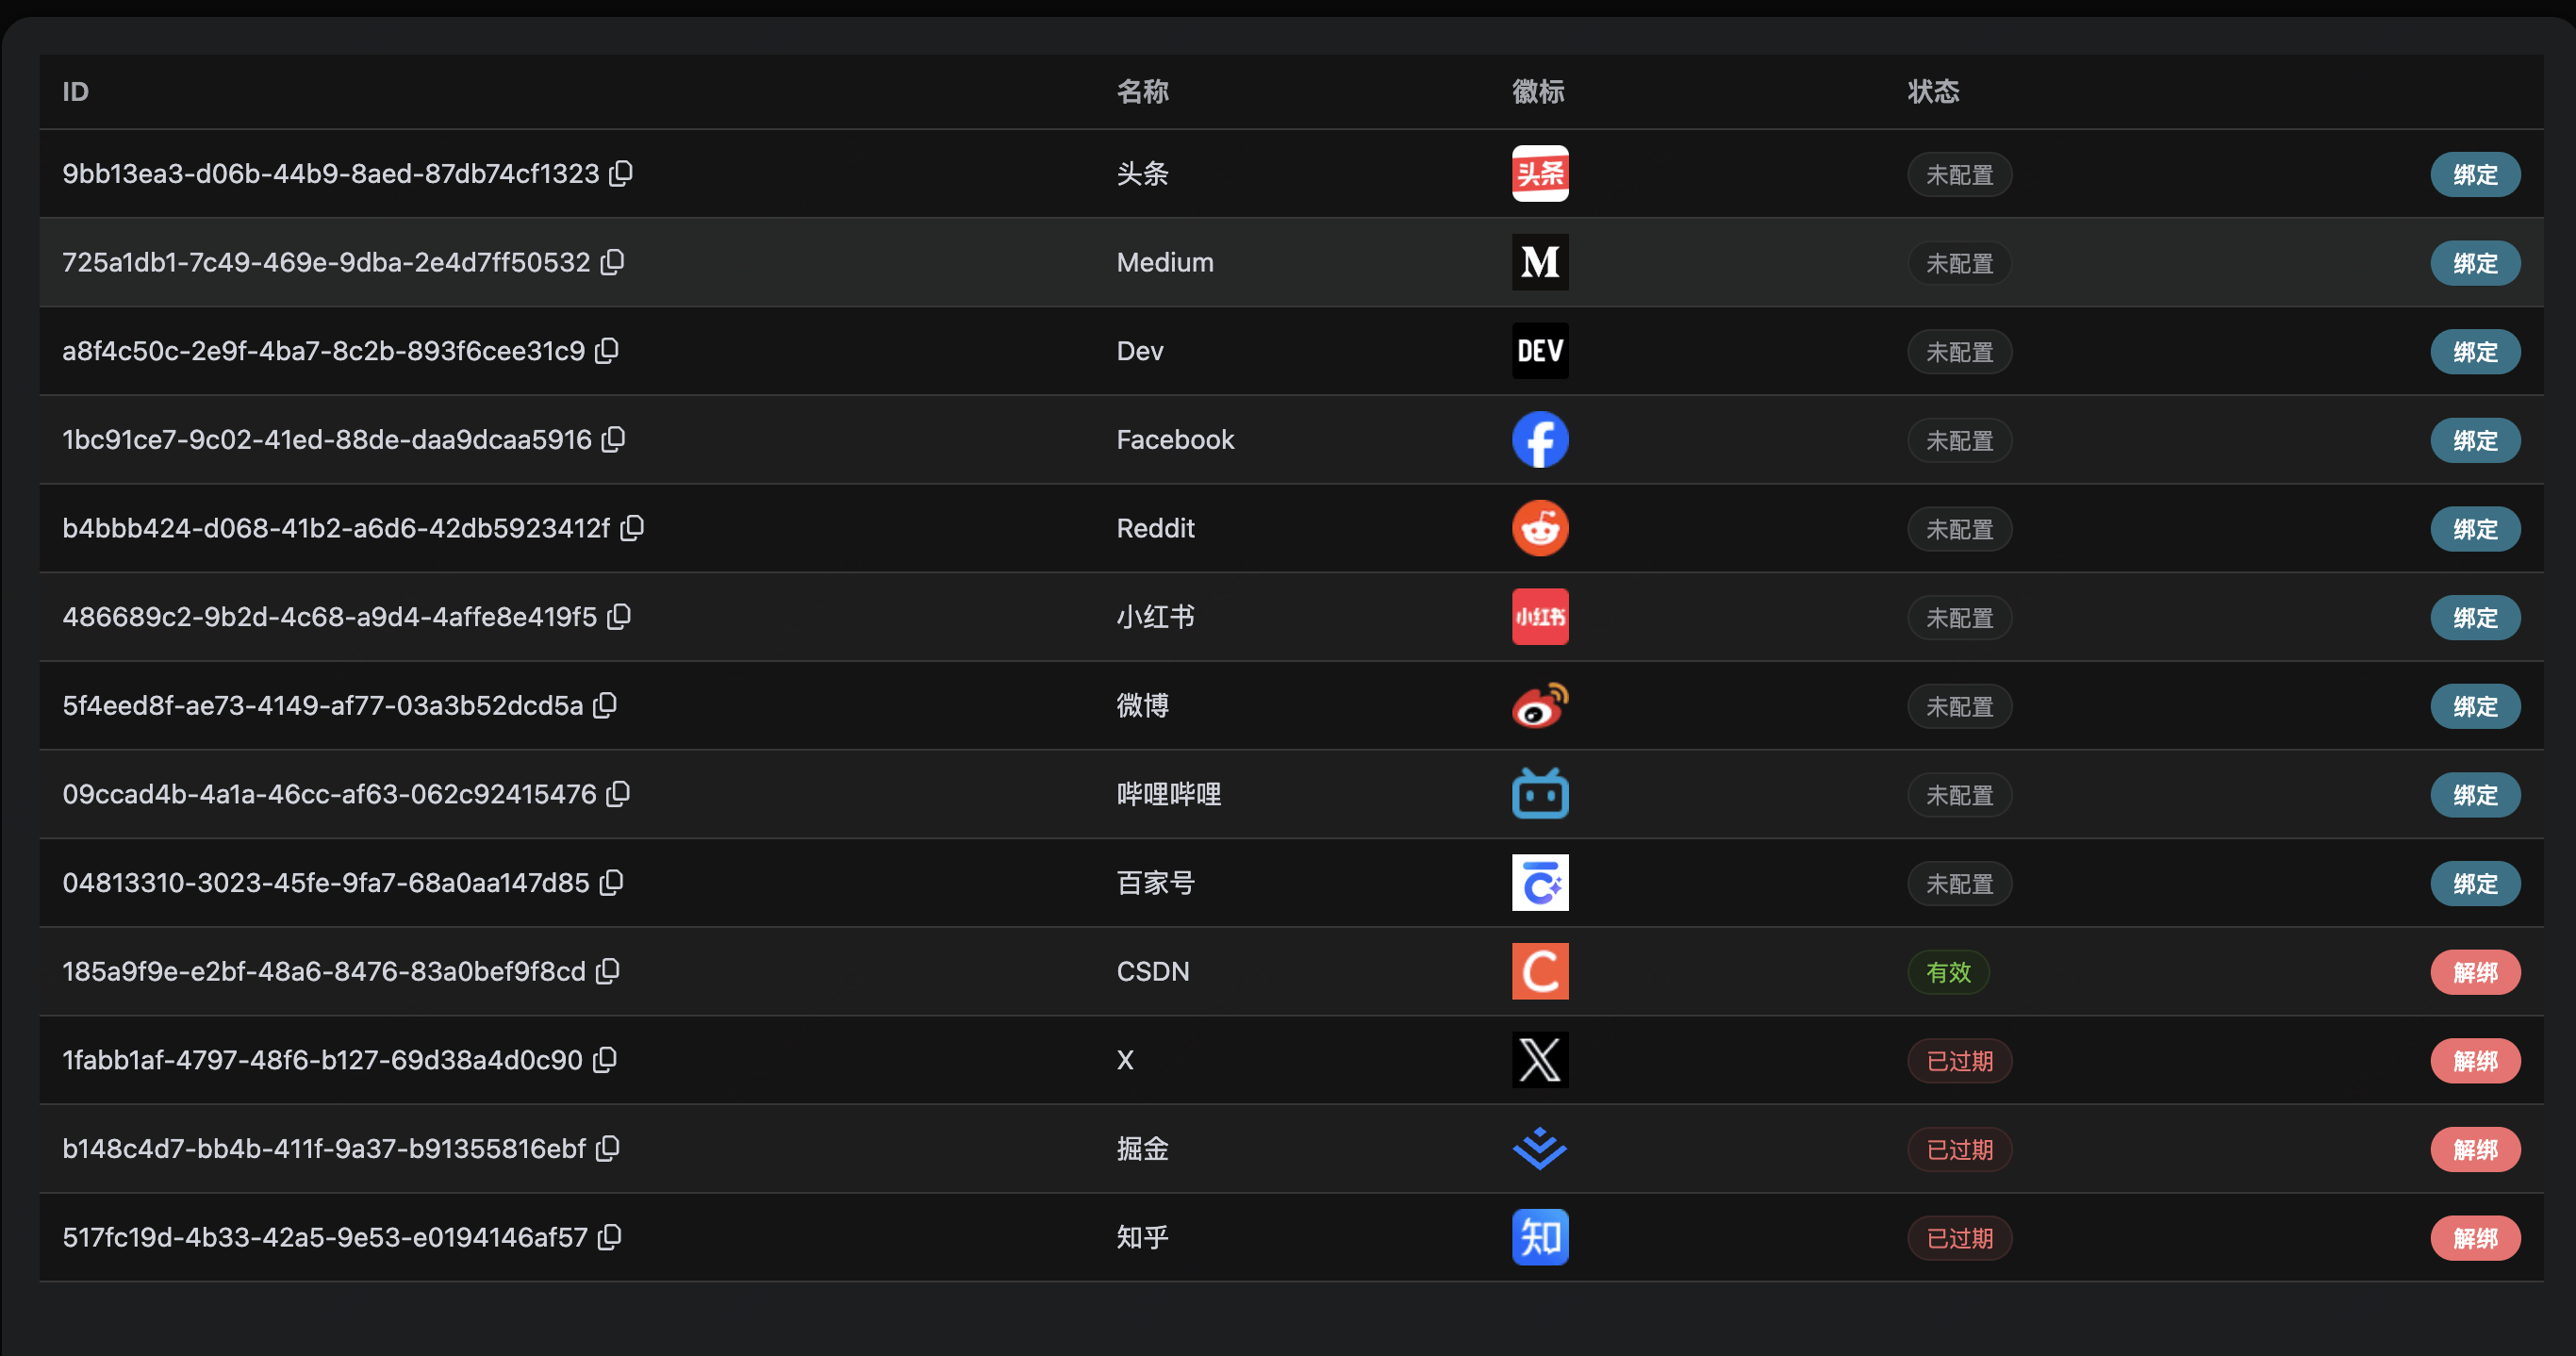
¶ 4.2 Step Two: Bind Publishing Channels (Authorize Third-Party Accounts)
- Objective: Authorize third-party platform accounts to Ace Data Cloud, establishing a publishing channel.
Operation:
- Enter the channel page: https://platform.acedata.cloud/console/publish/channels
- Find the platform that needs to be bound (such as Zhihu, CSDN, etc.)
- Click Bind, and follow the prompts to complete third-party platform login and authorization
- After successful binding, the channel status should change to Valid
Checkpoints:
- The target platform channel status displays Valid
- Multiple channels can be bound to achieve "one article, multiple publications"
Screenshot 2 (Channel Management)
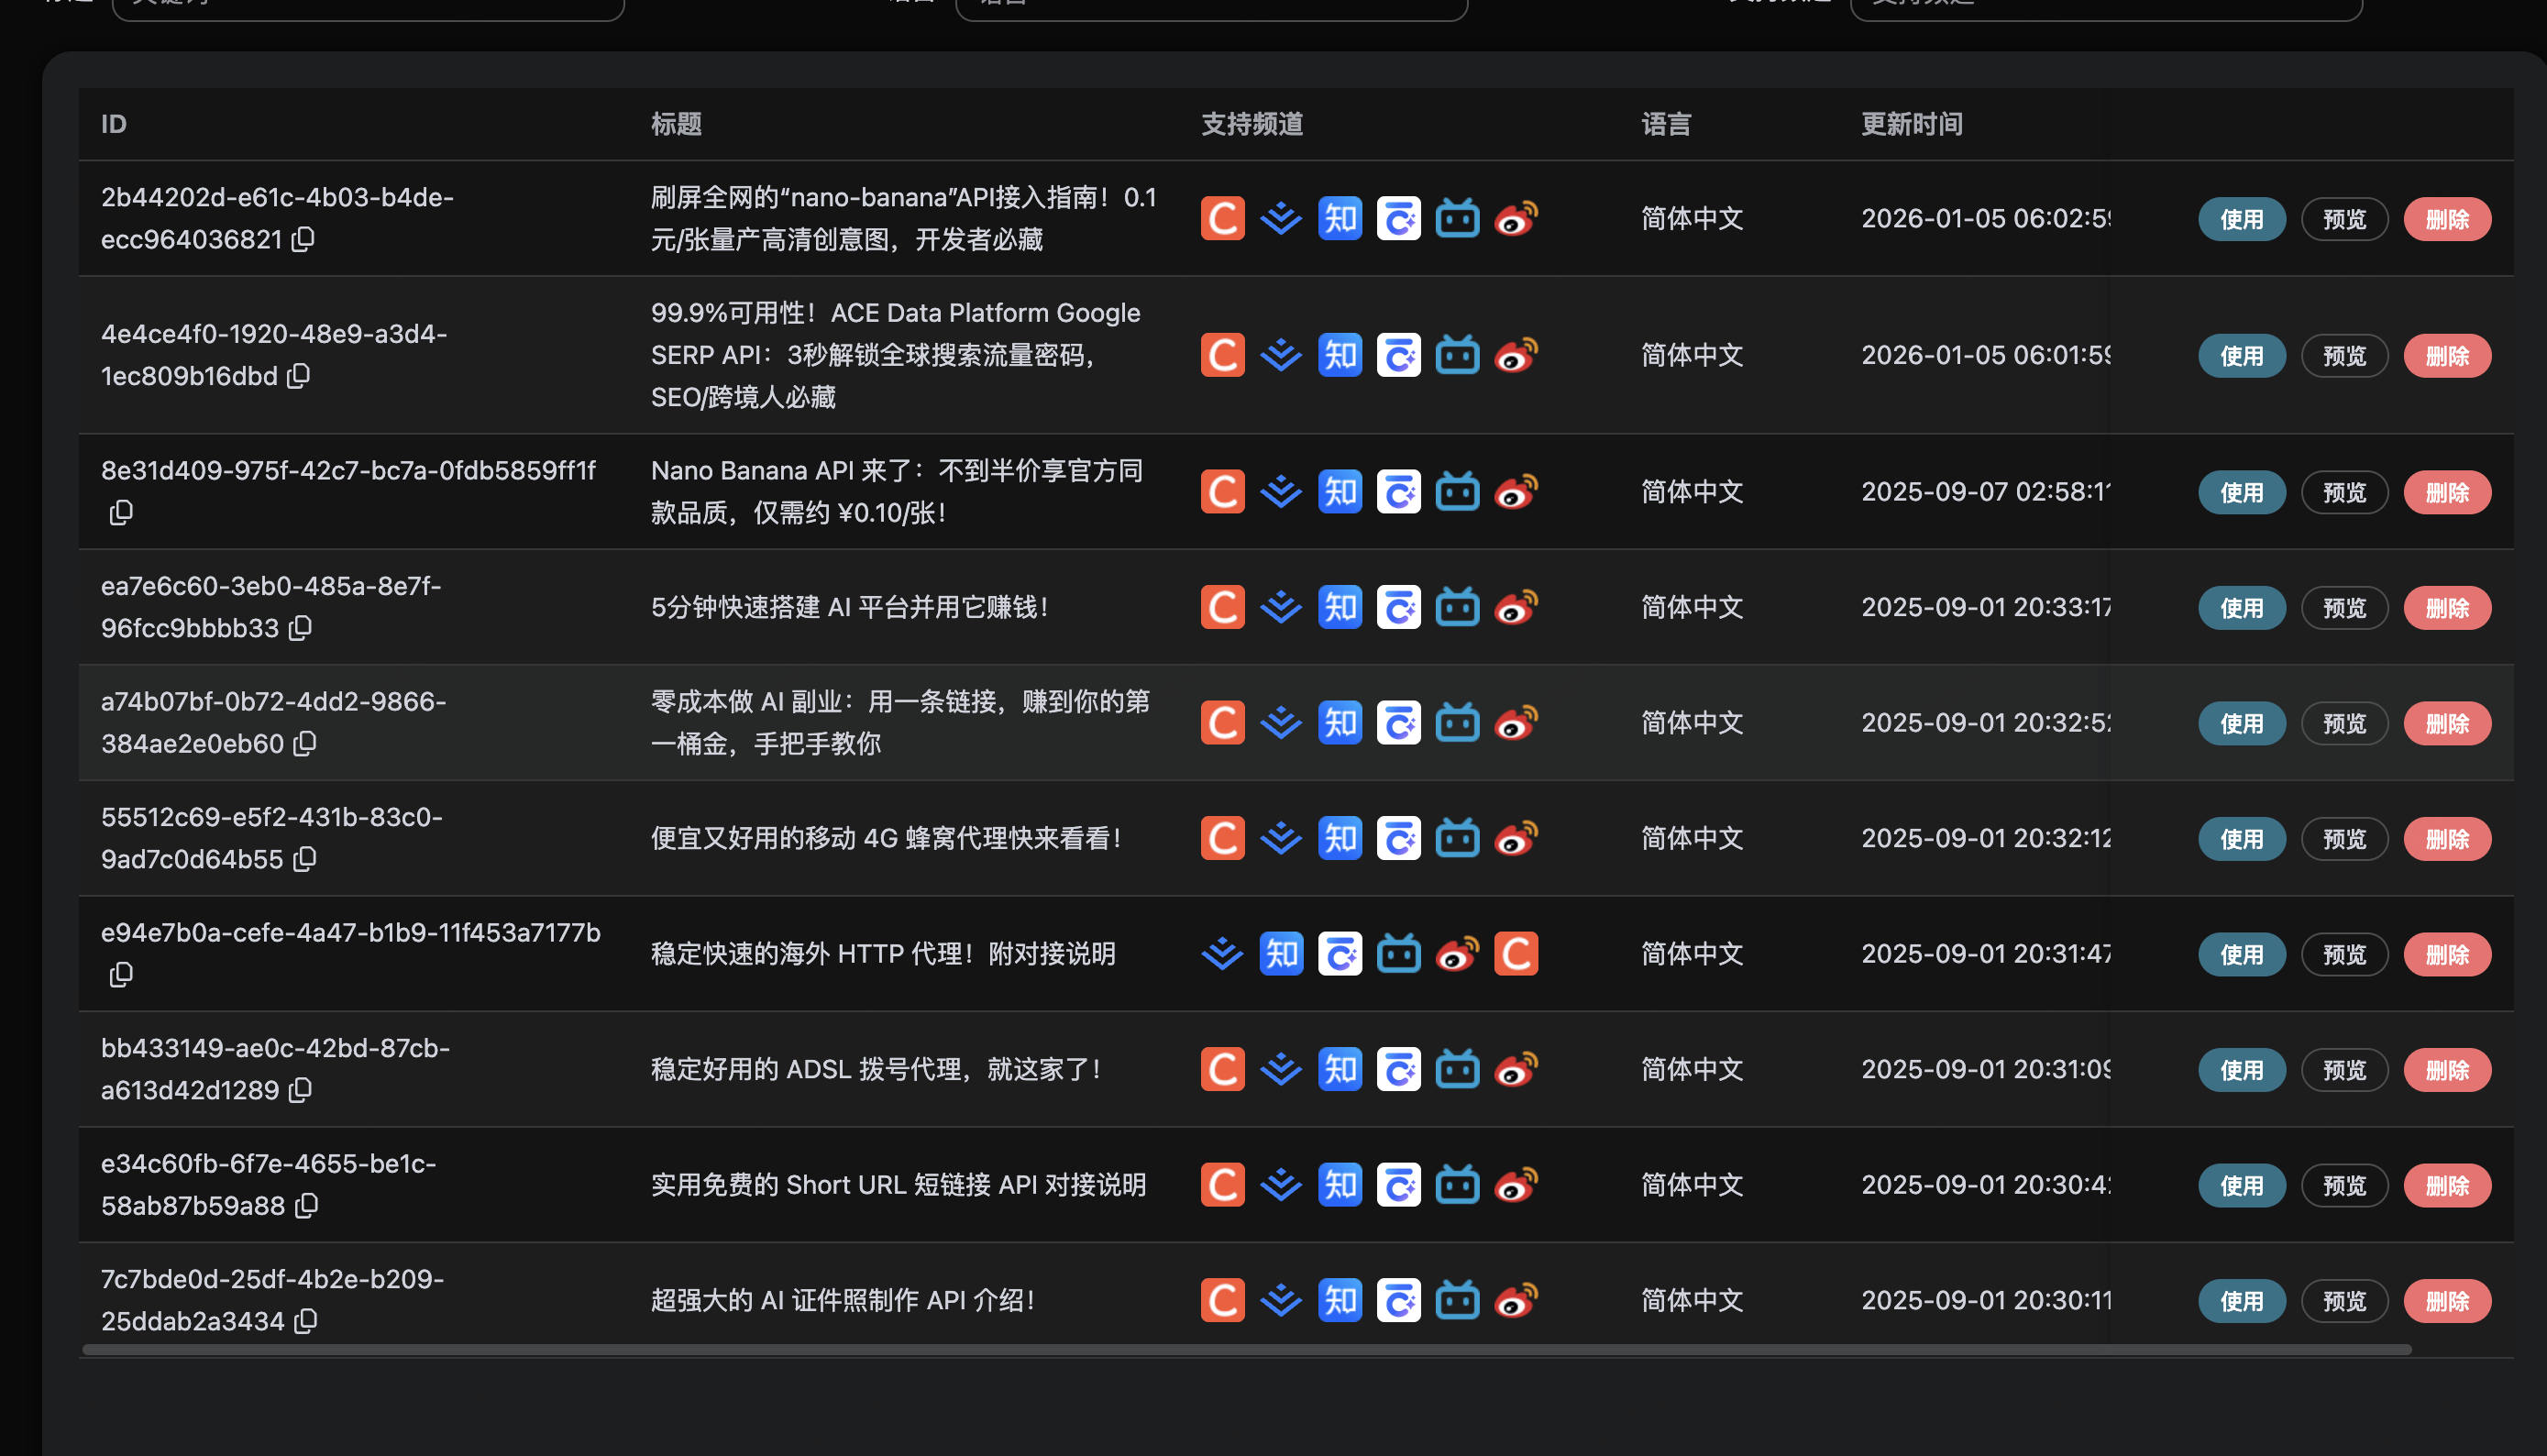
¶ 4.3 Step Three: Prepare Content (Create Docs from Material Library / Edit Docs)
- Objective: Obtain a publishable article draft and make necessary edits.
Common Path A: Select from Material Library and Generate Docs
- Browse/search content in the "Materials" library
- View titles, content, and supported channels
- Click Preview to confirm content suitability
- Click Use: The system will copy the material to your "Docs" list, forming an editable draft
Common Path B: Create Original Docs (if the platform supports "Create New Doc")
- Click New on the "Docs" page
- Enter the title and body, save as a draft
Checkpoints:
- The document has been generated and can be accessed for editing
- Title, body, and format meet the publishing requirements of the target platform
¶ 4.4 Step Four: Manual Publishing (Select Channels and Generate Publishing Tasks)
- Objective: Publish the specified document to multiple bound channels.
Operation:
- Find the target article in the "Docs" list
- Enter the editing page to complete the final check (title optimization, formatting, links, etc.)
- Click Publish
- In the pop-up window, check the channels to publish to
- Confirm publishing → The system creates a publishing task
Checkpoints:
- The publishing task has been generated
- Status changes from "In Progress" to "Completed"
- You can click the link in the task to jump to the third-party platform to confirm the article has been published
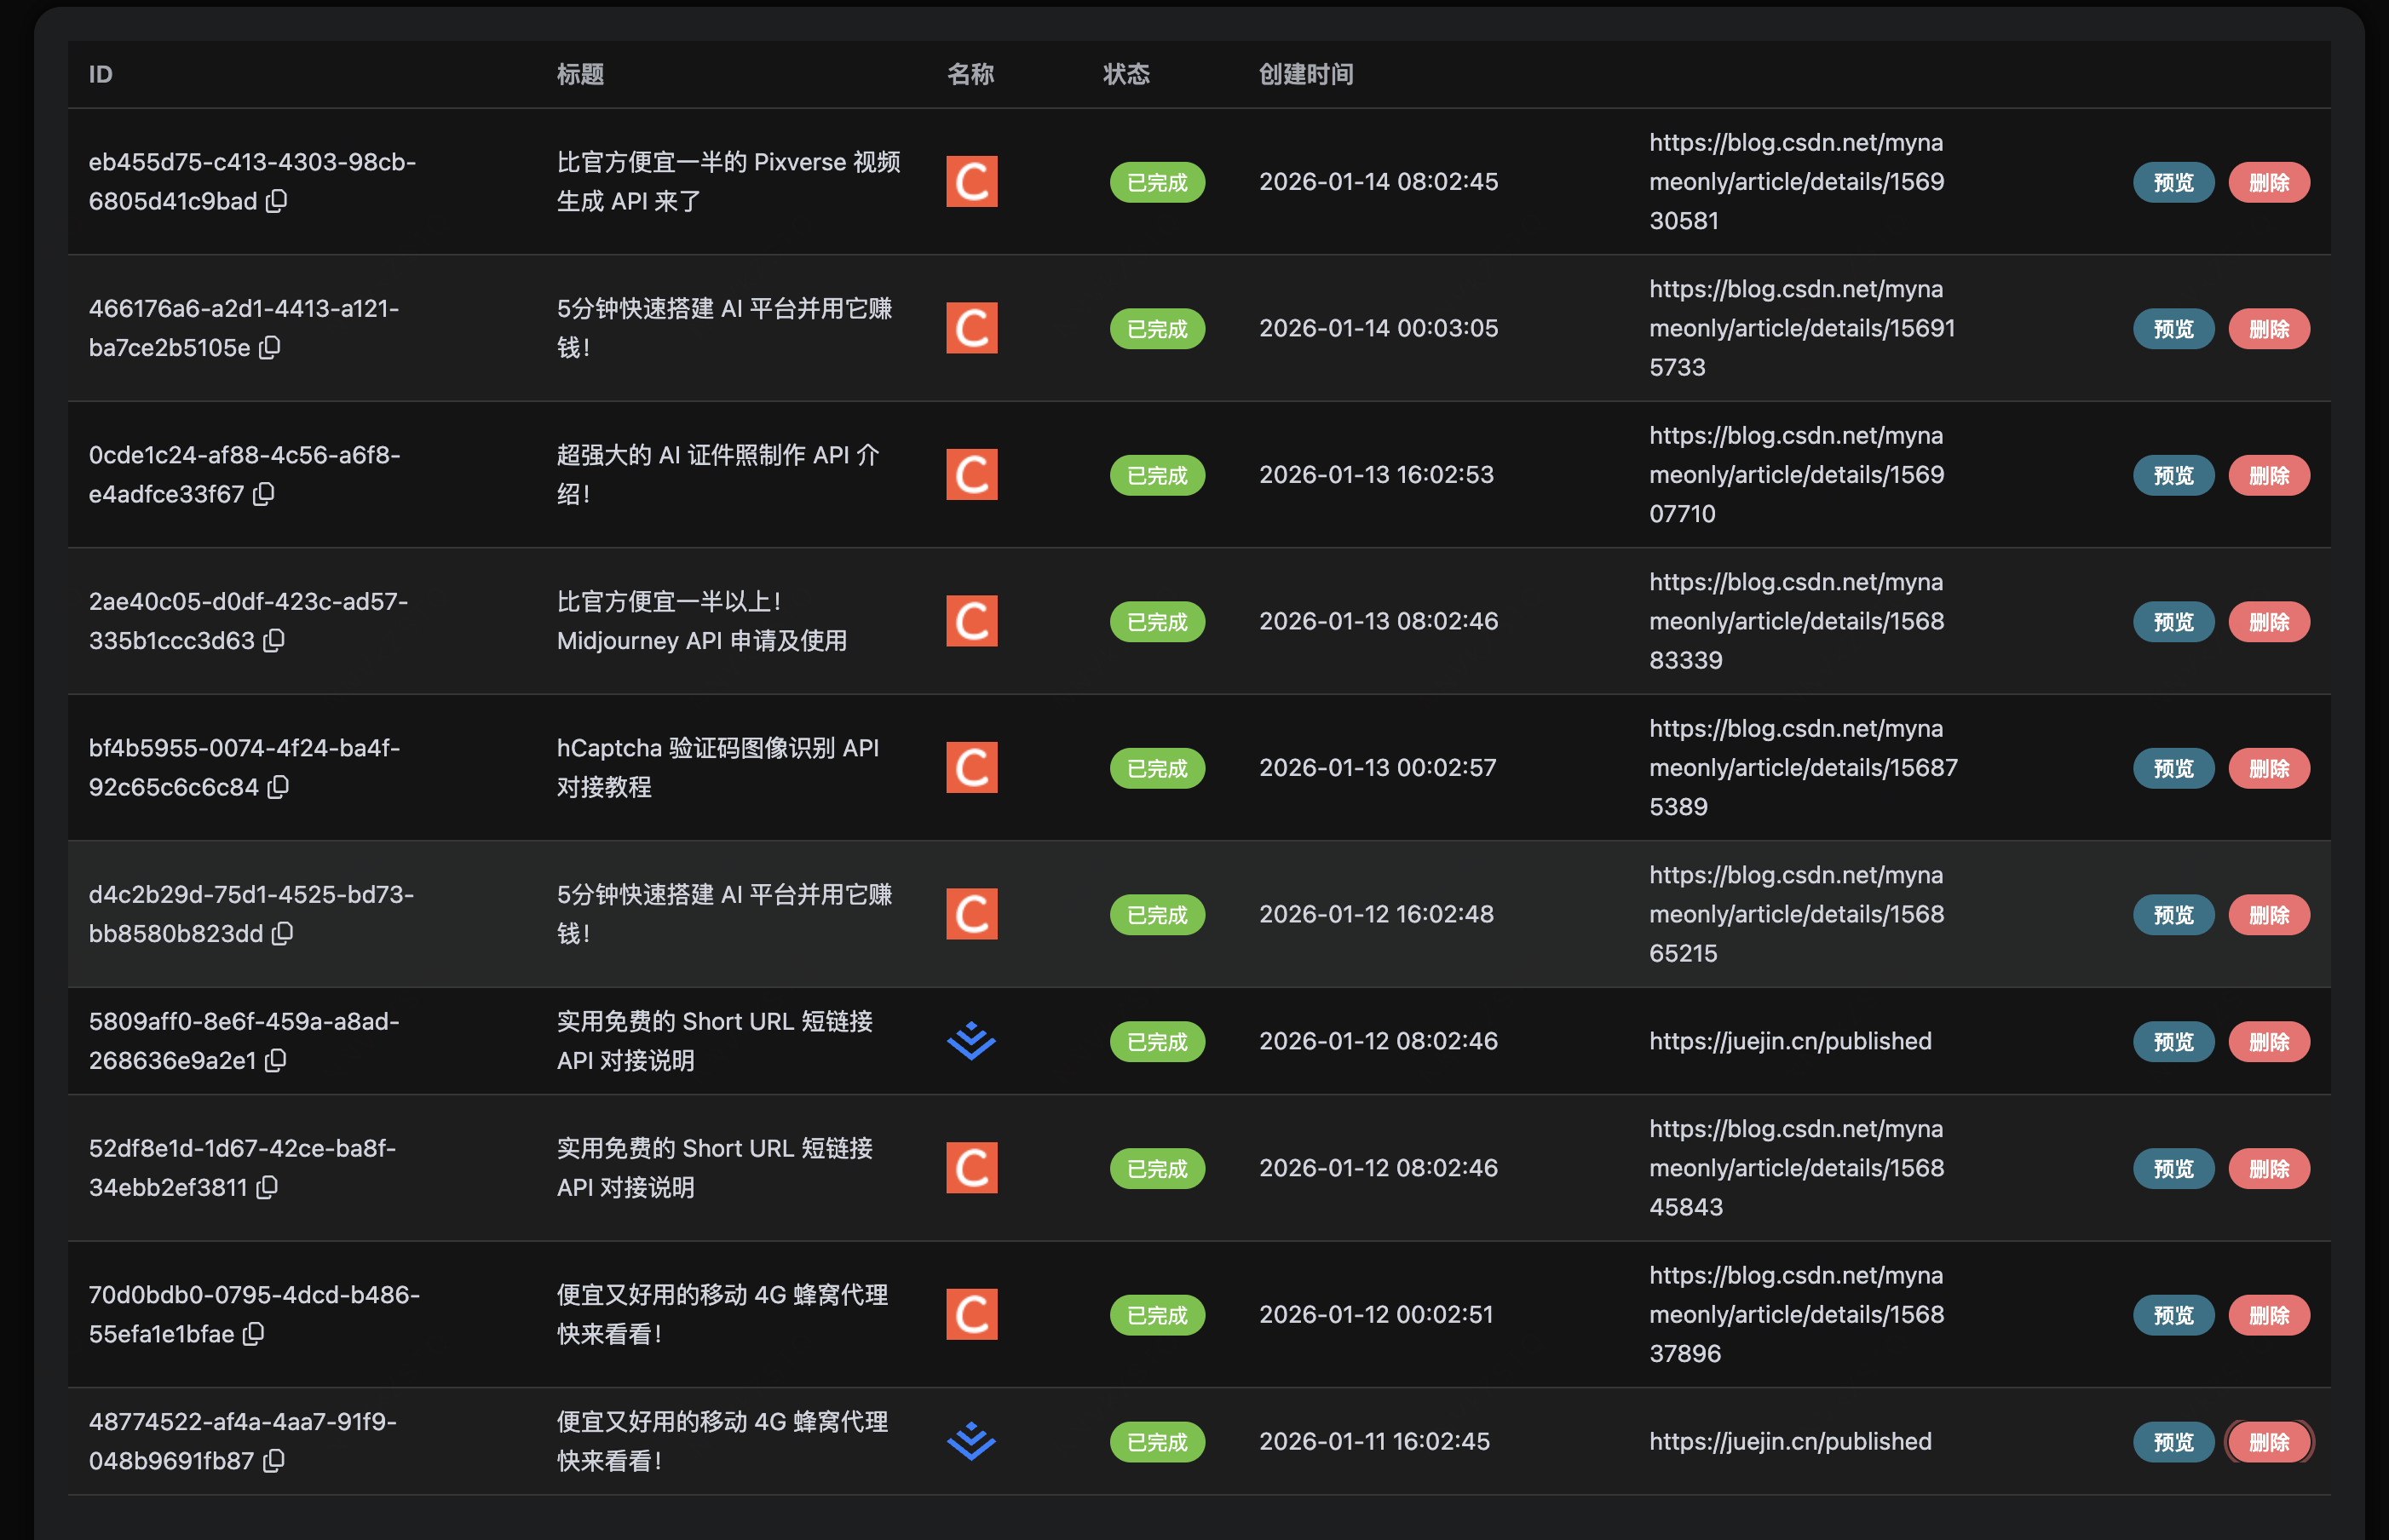
¶ 4.5 Step Five: View Publishing Tasks (Track Status and Result Links)
- Objective: View the history and results of manual/automatic publishing in one place.
Operation:
- Enter the publishing tasks page (or access the task list from the distribution center)
- View task status, publishing time, target channels, and external links
- Retry or reauthorize channels for abnormal tasks as prompted
Checkpoints:
- Task status is clear and traceable
- Completed tasks have accessible external links
Screenshot 3 (Publishing Tasks)
¶ 4.6 Step Six: Enable Automatic Publishing (Fully Automated Distribution)
- Objective: After enabling automatic publishing, the system will automatically select content and publish to "valid channels" according to rules.
Operation:
- Return to the Publishing Center
- Find the Automatic Publishing module
- Toggle the switch from "Off" to "On"
- Periodically check the "Publishing Tasks" to confirm the tasks created and completed automatically by the system
Checkpoints:
- The automatic publishing switch is in the on position.
- Automatic task records continue to appear during the publishing task.
Screenshot 4 (Publishing Overview/Summary)
¶ 5. Frequently Asked Questions (FAQ)
¶ Q1: What should I do if the channel binding fails / the status shows "expired"?
- Suggested action: First unbind and then rebind, and complete the authorization login as prompted on the page.
- If it still fails: Check if the browser plugins are installed and enabled, and whether the third-party platform has triggered risk control/two-factor authentication.
¶ Q2: Can I publish my own original articles?
- Yes. Generally, you can support creating a new document on the "Documents" page, and after creation, publish it following the "manual publishing" process.
¶ Q3: If I don't like the content published automatically, can I intervene?
- Yes. You can turn off the automatic publishing switch in the publishing center at any time.
- You can also only bind the platform channels you wish to distribute automatically, reducing unwanted platform coverage.
¶ Q4: How can I check the publishing effect (views/interactions, etc.)?
- Click on the external link in the publishing task to view data on the third-party platform;
- If there is a statistics module within the platform, you can also view the summary in the overview/report.
¶ 6. Summary (Shortest Path)
- Plugin installation successful → Bind channel (valid) → Prepare document → Publish and view task → (optional) Enable automatic publishing